Spring REST Response Processing
Introduction
Requests and Responses are building blocks of any REST API. They must be built and handled properly to make any API to work without glitches. Though the Spring framework takes care of many configurations behind the scene, there are certain things as a developer one must understand. In this article, we will focus on the response processing part of a REST API using Spring Boot.
Spring REST API Responses
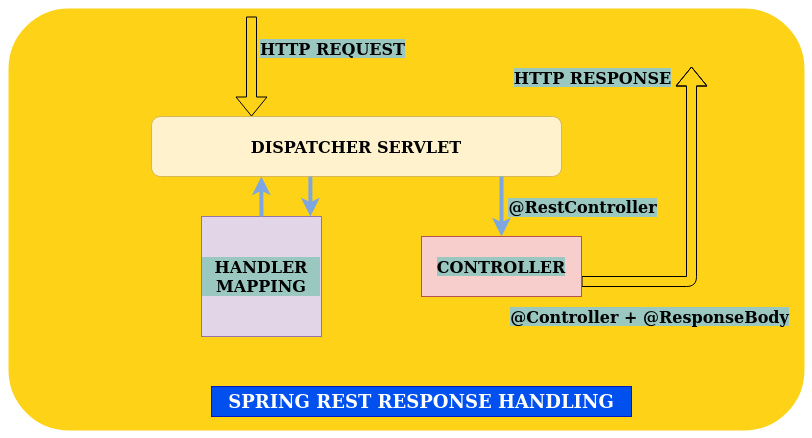
Once the request is processed by request handlers and resources methods, the next step in the pipeline is to build an appropriate response to the client. The below given diagram is a high level process summary on how responses are handled in REST.
There are multiple ways to build a response using the Spring framework. They are:
- Response Body
- Response Entity
Response Body
The @ResponseBody annotation in Spring Boot is used for binding a return value from a resource method to a web response body. This is done by the use of HTTP message converters. This conversion is done by looking at the content-type value in the HTTP request header.
Let us consider the following example:
|
@RequestMapping(path = “/FindEmployee/1234”, produces = “application/json; charset=UTF-8”)
@ResponseBody
public List<Employee> findEmployee() {
var employeeData = (List<Employee>) employeeDatabase.findAll();
return employeeData; }
|
in the above code, the request comes to find the employee details for the given employee id. The media type in the request header is JSON. Now the resource method findEmployee() is called that will return the result.
Now there is a class in Spring known as RequestResponseBodyMethodProcessor. It will collect the return values from methods that are annotated with @ResponseBody. This value is then written into the body of the response. A suitable HTTP message converter class will be called during this process. In our case since the media type is JSON, the MappingJaxkson2HttpMessageConverter class will be called. This class will read and write JSON using Jackson Object Mapper. Jackson is a popular Java JSON library. The response body is now ready with the response data in the JSON form which can be transported to the client over the network.
Response Entity
The main difference between the Response Body and Response Entity is that the @ResponseEntity annotation represents the whole of the response including the message body, response header, and the status code. The advantage of using this method is flexibility. We can fully configure the response to the client the way we want.
The following code sample will give an idea about the usage of @ResponseEntity.
|
@GetMapping(“/employeeID”)
ResponseEntity<String> getEmployee(@RequestParam(“employeeID”) int employeeID)
{ HttpHeaders httpHeaders = new HttpHeaders();
httpHeaders.add(“My-Header”, “foo”);
if (idNotNumber(employeeID)) {
return new ResponseEntity<>(“Employee ID must be a number”, HttpStatus.BAD_REQUEST);
}
return new ResponseEntity<>(“Employee Details: ” + findEmployee(employeeID), HttpStatus.OK);
} |
Here we have used all the major possibilities of @ResponseEntity. We can build a custom response with custom HTTP headers, Status code & message using this method.
Summary
Building an API response in the Spring framework can be done using ResponseEntity and Response Body annotations. Though @ResponseBody will cater to the basic requirements, @ResponseEntity annotation provides better control and flexibility in building a response. When we need to build responses with a lot of customization, then the @ResponseEntity would be a better choice.
Share